- Published on
How To Generate a Snake-eating Graph using Github Actions (step by step)
- Authors
- Name
- Cristian Encalada
Instead of having the default github profile view, it's possible to generate a snake-eating image like above using the snk tool in Github actions.
In this tutorial there are many screenshots and step by step instructions during all the process. The objective is that everyone, even with a basic technical knowledge was able to try and update Github's personal profile and at the same time learn have an introduction to the basics of GitHub Actions tools.
The only prerequisite is to have a Github account.
0. Interactive demo
Before starting, If you'd like to try by yourself an interactive demo, you can do it here using your github username:
https://platane.github.io/snk/

Let's start step by step.
1. Create a 'special' Github Repo for your profile:
First, we need to create a new Github repo to display the snake generated later.
Create a new public repository, and name it as your own github username, the name is very important.
On your github's user page, click on the Repositories tab on the top and then click on the New button on the right.
Fill in all the required fields as follow and click on th button Create repository.
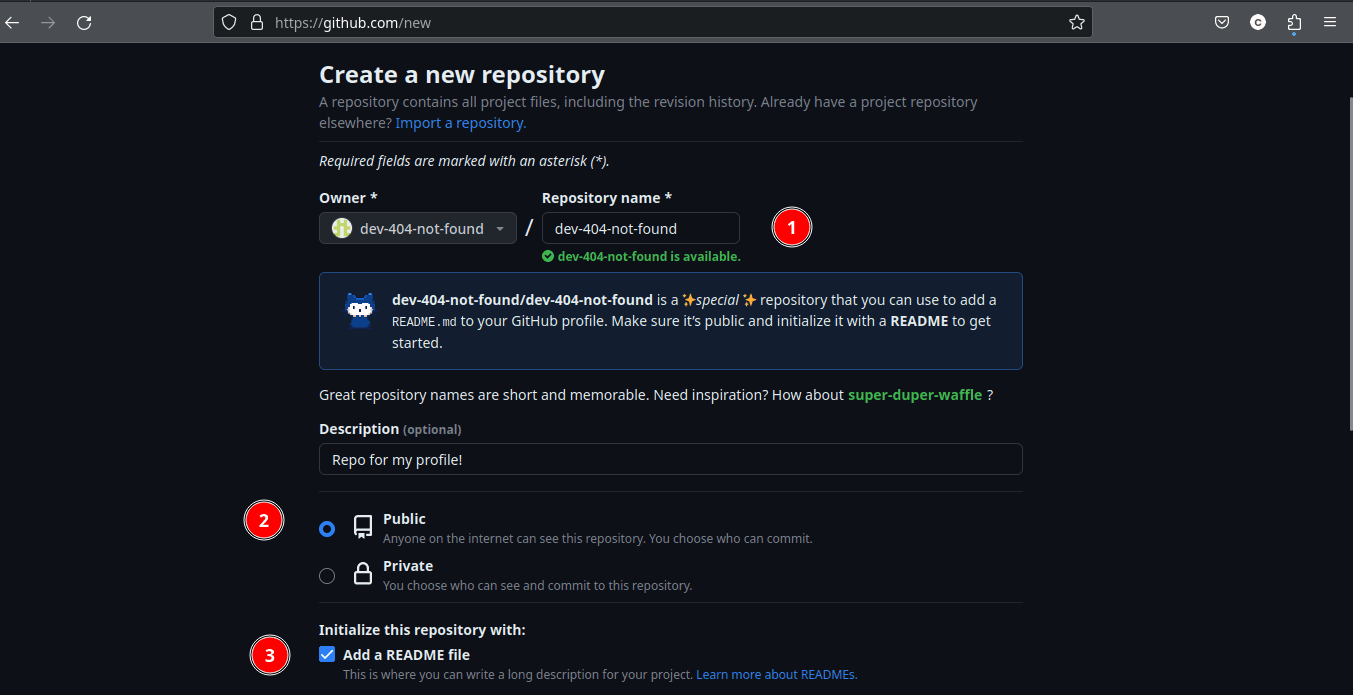
You should have some message similar to this (in this case, dev-404-not-found is the github username):
dev-404-not-found/dev-404-not-found is a ✨special ✨ repository that you can use to add a README.md to your GitHub profile. Make sure it’s public and initialize it with a README to get started.
The new repo should be ready and have the main branch by default.
2. Set up SNK Github Actions tool
- In the new repository created, click on the Actions button on the top.
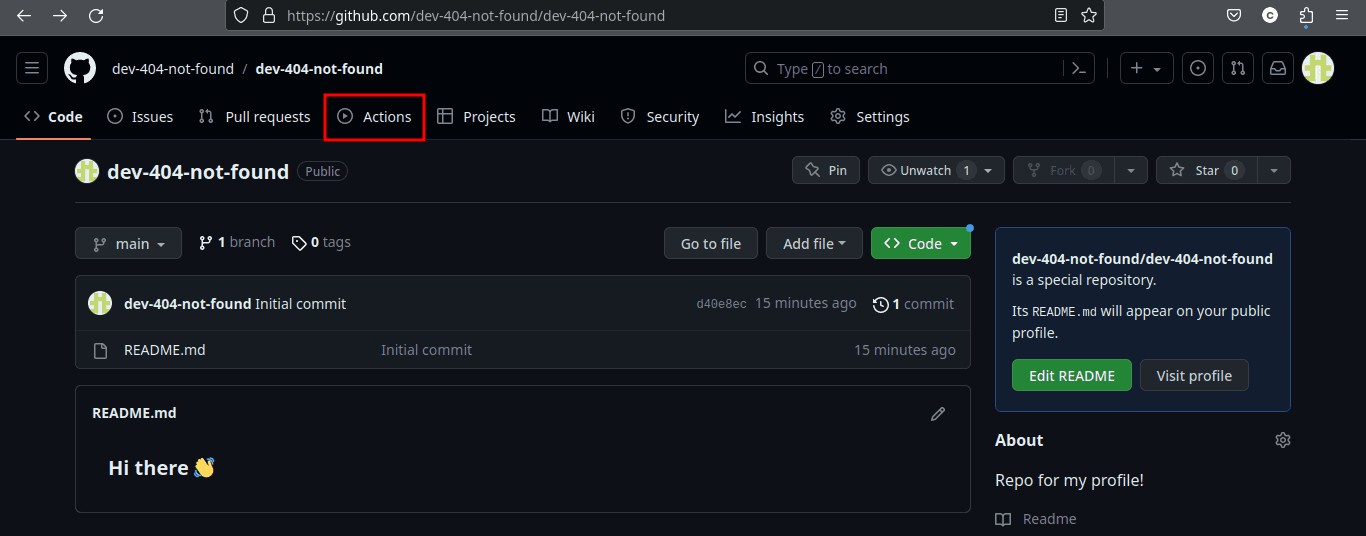
- Click on set up a workflow by yourself ->

- Change the
.ymlfile tosnake.ymlor any other name that you want. This change is if in the future, you want to add more workflows and the default main.yml could cause conflicts.
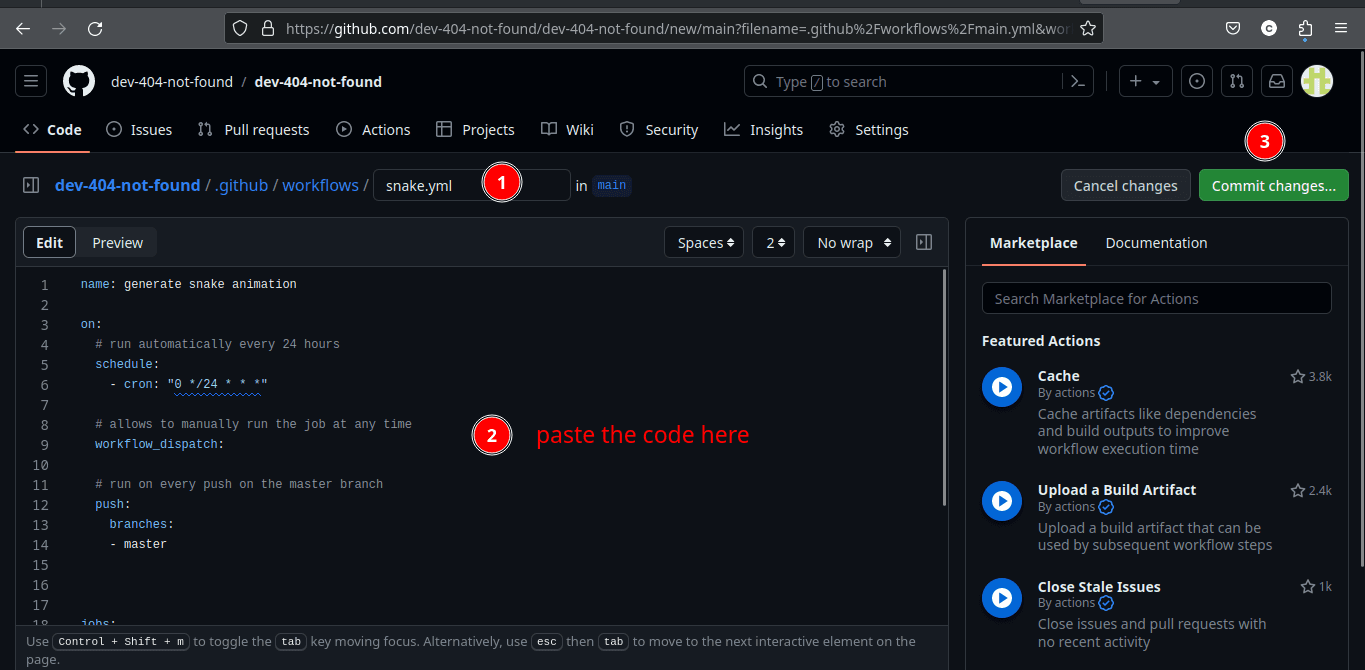
- Then copy the following code in the Edit body:
name: generate animation

on:
  # run automatically every 24 hours
  schedule:
    - cron: "0 */24 * * *"

  # allows to manually run the job at any time
  workflow_dispatch:

  # run on every push on the master branch
  push:
    branches:
    - master

jobs:
  generate:
    runs-on: ubuntu-latest
    timeout-minutes: 10

    steps:
      # generates a snake game from a github user (<github_user_name>) contributions graph, output a svg animation at <svg_out_path>
      - name: generate github-contribution-grid-snake.svg
        uses: Platane/snk/svg-only@v3
        with:
          github_user_name: ${{ github.repository_owner }}
          outputs: |
            dist/github-contribution-grid-snake.svg
            dist/github-contribution-grid-snake-dark.svg?palette=github-dark
        env:
          GITHUB_TOKEN: ${{ secrets.GITHUB_TOKEN }}


      # push the content of <build_dir> to a branch
      # the content will be available at https://raw.githubusercontent.com/<github_user>/<repository>/<target_branch>/<file> , or as github page
      - name: push github-contribution-grid-snake.svg to the output branch
        uses: crazy-max/ghaction-github-pages@v3.1.0
        with:
          target_branch: output
          build_dir: dist
        env:
          GITHUB_TOKEN: ${{ secrets.GITHUB_TOKEN }}
- Click on the Commit changes button, the option Commit directly to the main branch should be selected by default and Click on Commit changes again.
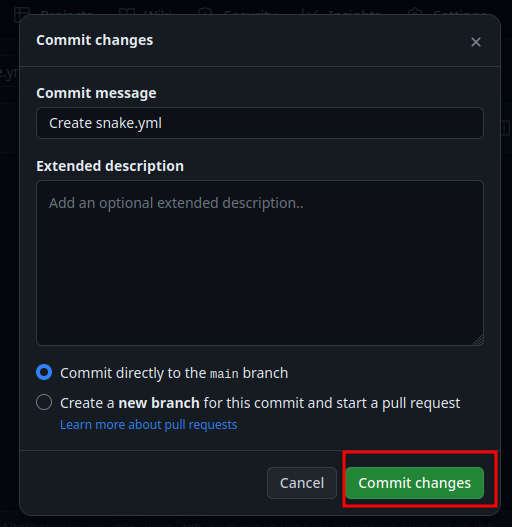
That's all, now,the new workflow should be ready for the next step.
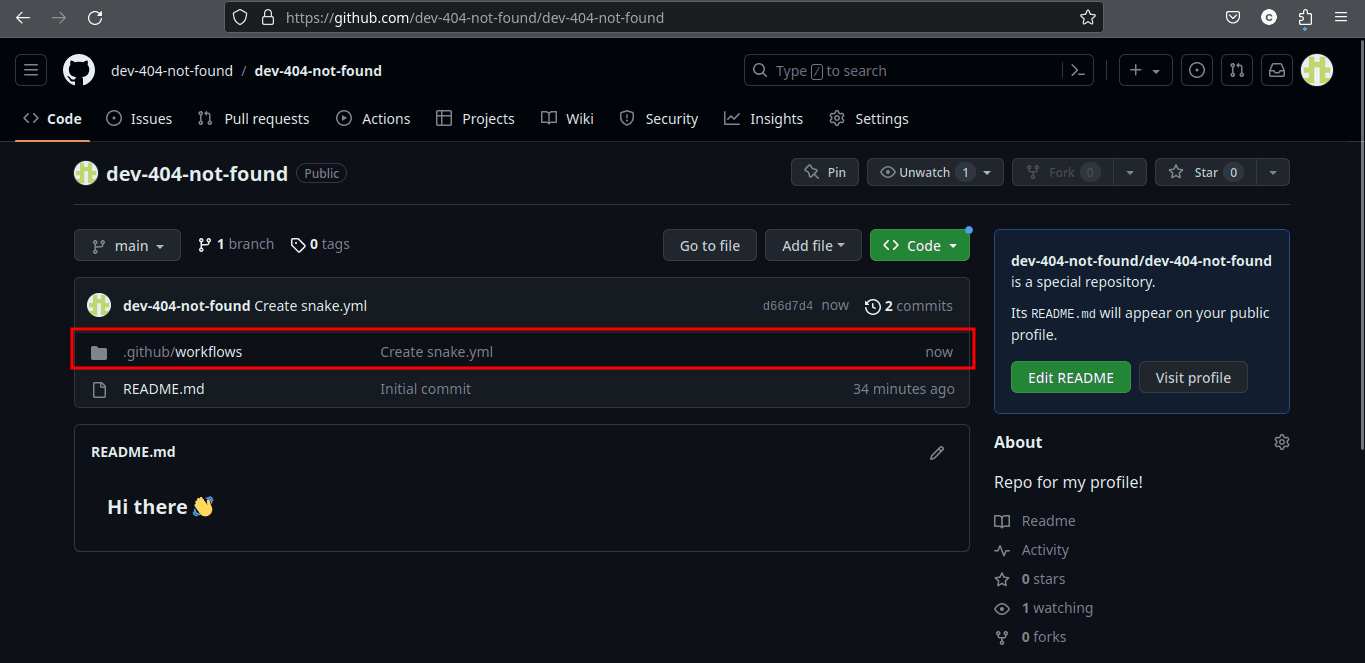
- To verify the new Github Action workflow, you can check your repository files, should be a new directory called
.github/workflows:
3. Create a Personal Access Token and an Action Secret for the workflow
Last but not less important is the credentials for the workflow, if not, it will fail and not generate the snake image.
Generate a Personal Access Token
- Click on your profile icon (top-right corner) and click on
Settingsoption in the menu.
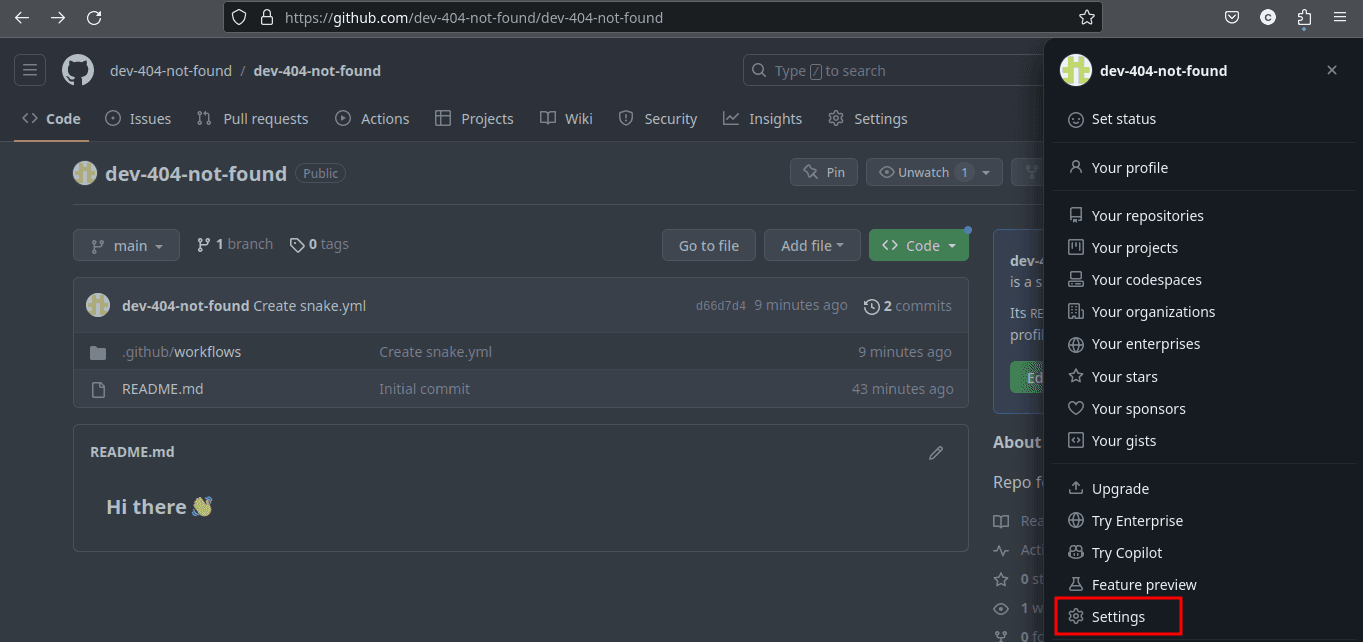
Optionally you can use access through this link: https://github.com/settings/profile
Click on the Developer settings button at the bottom of the left menu.

Optionally you can use access through link: https://github.com/settings/tokens
Click on the Personal access tokens -> Tokens(classic) -> Generate new token -> Generate new token (classic)

- Fill in the first fields:
- Note:
workflow_token - Expiration:
90 days - Check the
workflowcheckbox (it will automatically check all repo scopes)
- Note:
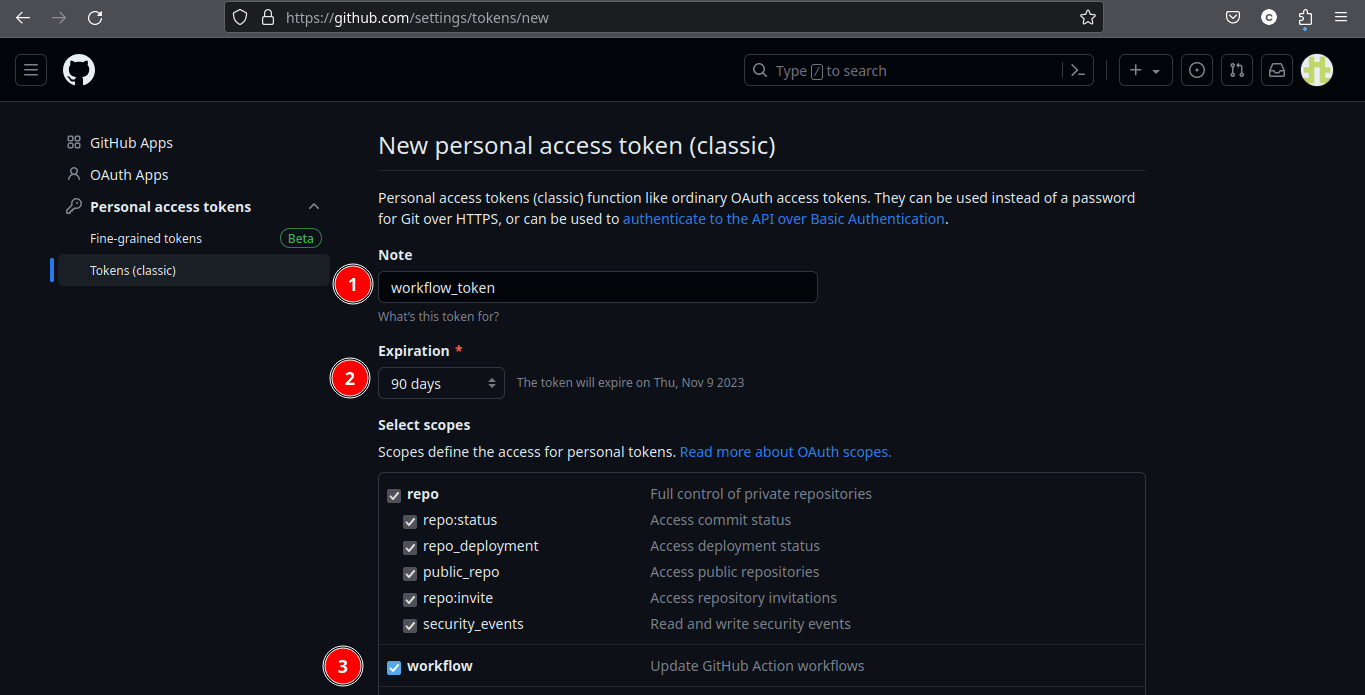
Click on Generate token button at the bottom
Your new token should be ready, it will be used adding the new secret.
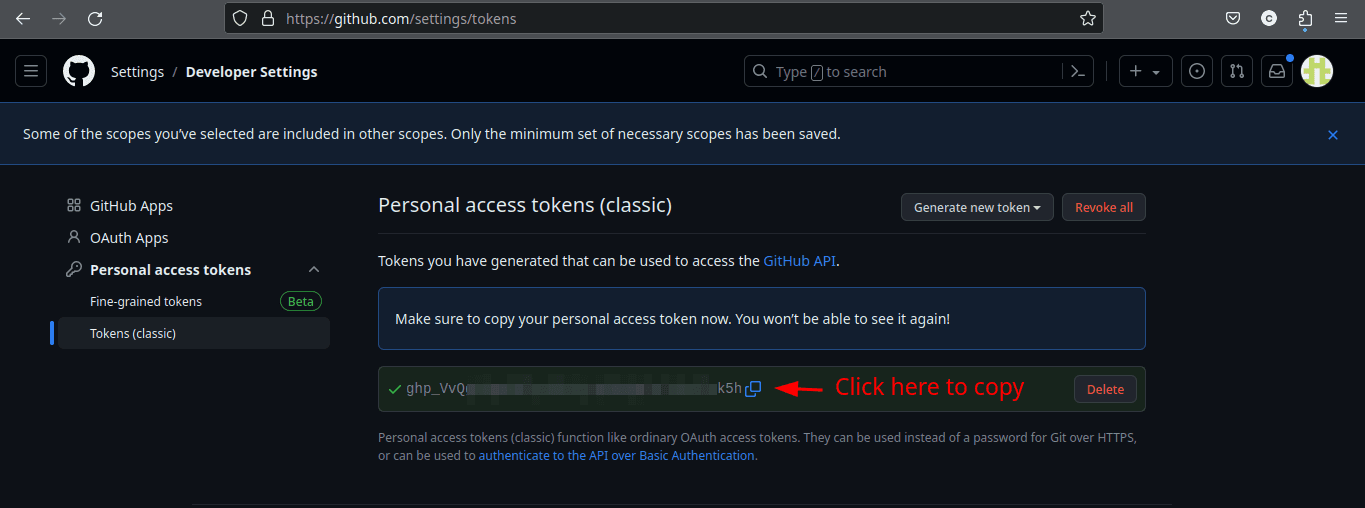
Important!As the message say: Make sure to copy your personal access token now. You won’t be able to see it again!
Generate a Repository Action Secret
Now let's configure the action secret for the new personal repository. This is the "hardest" part because most of the errors happen here, but don't worry, just follow the steps carefully and it will work.
- In the 'special' repo created at the beginning, click on the
Settings

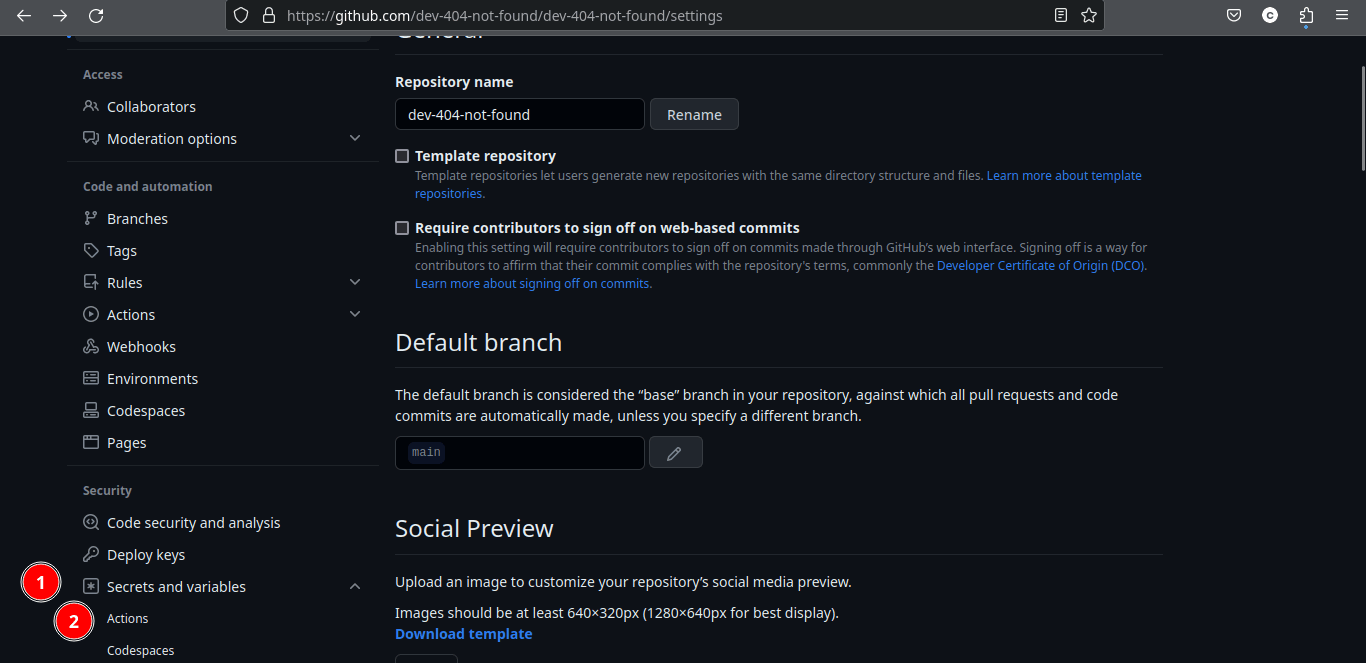
Make sure that you are in the correct repo, checking the URL, should be something like this (dev-404-not-found is my github username) https://github.com/dev-404-not-found/dev-404-not-found/settings
- On the left menu, click on Secrets and variables -> Actions
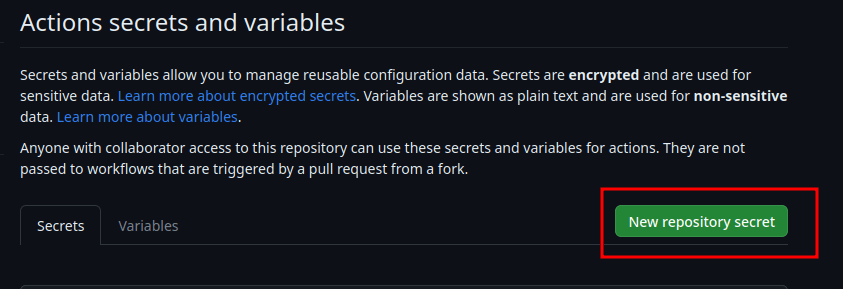
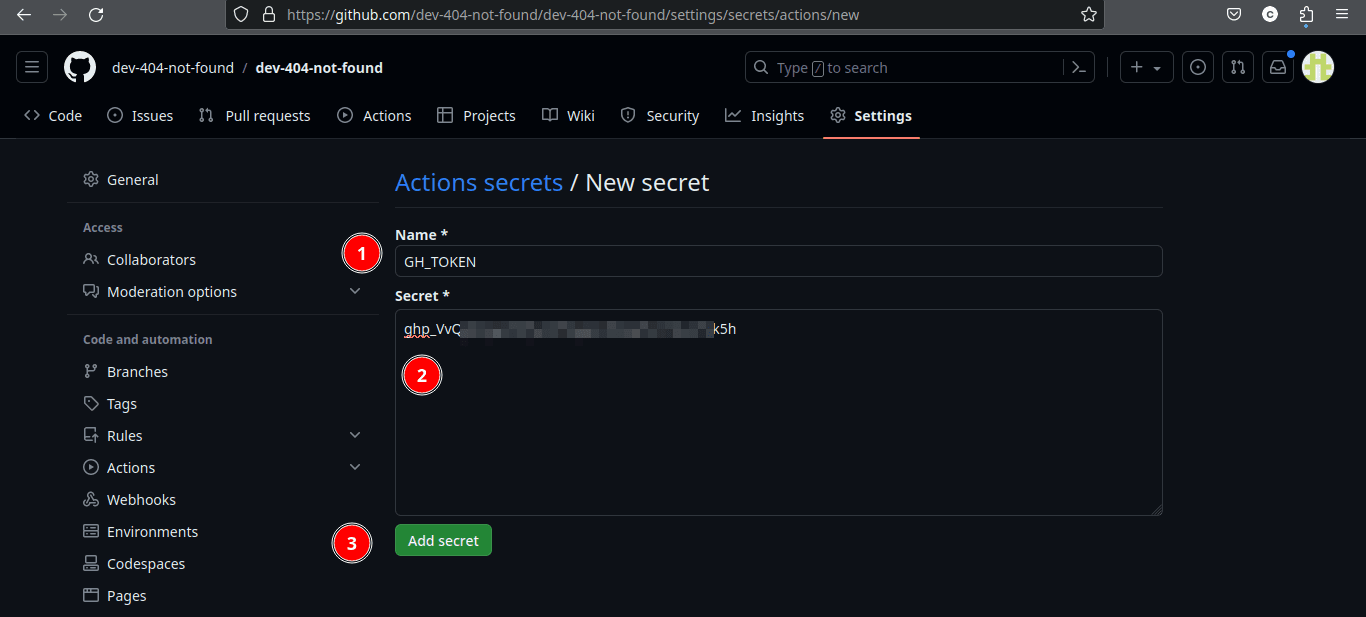
- Fill in the firs fields:
- Name:
GH_TOKEN - Secret:
ghp_xxxxxxxxxx- Use the token generated previously here
- Click on Add secret button at the bottom
- Name:
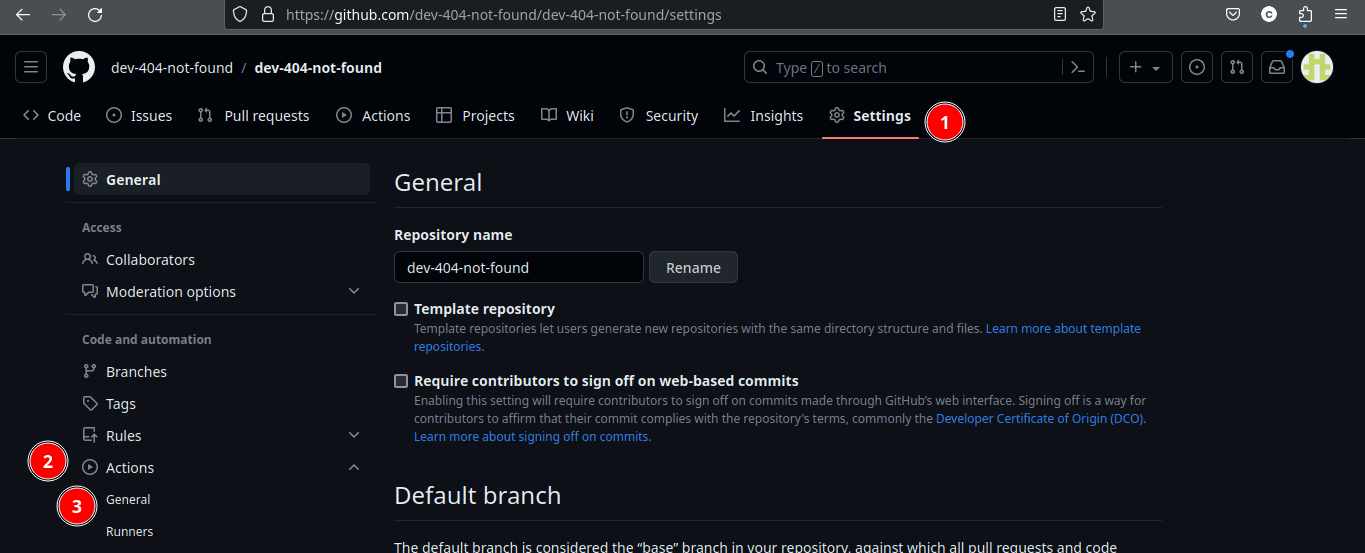
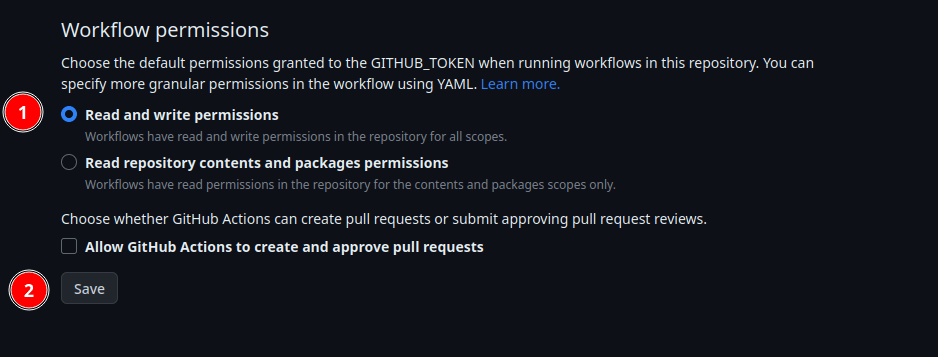
Set workflow read and write permissions
Before run the workflow go to Repository -> Settings -> Actions -> Workflow permissions -> Select: Read and write permissions
Execute manually the workflow
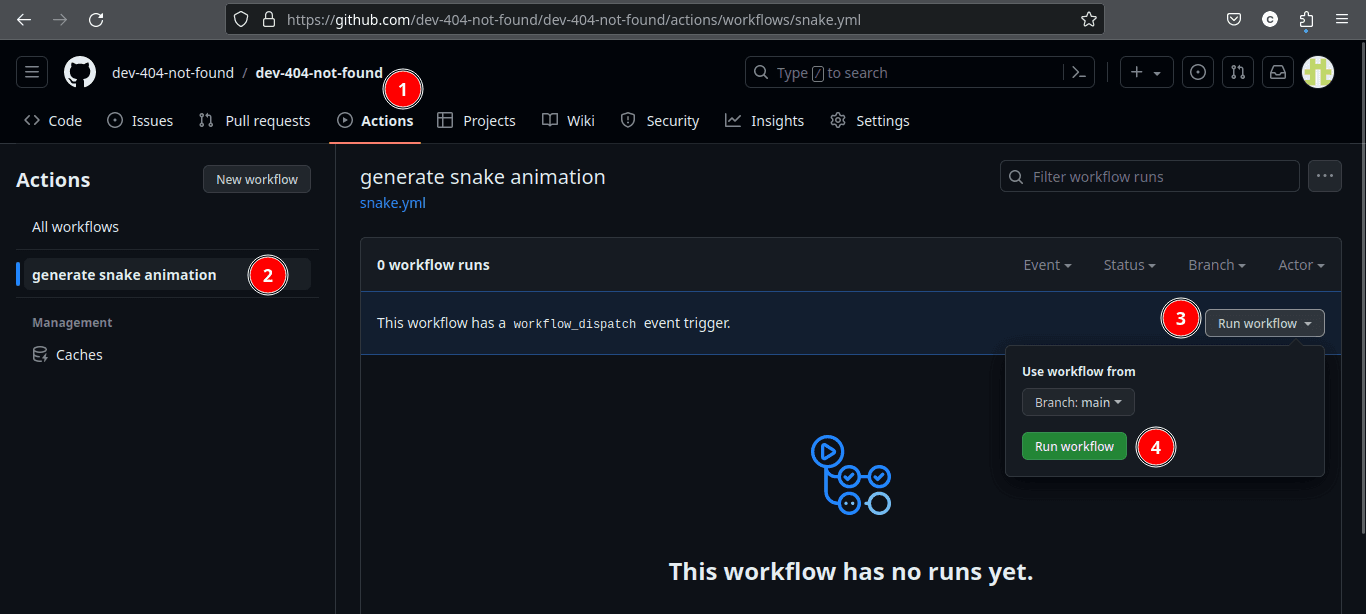
- Finally execute manually just for the first time the workflow
Still in your repo go to Actions -> All workflows -> generate snake animation -> Run workflow -> Run workflow (by default in main branch)
If the workflow was executed without errors a green check should be displayed. It will be executed every 24 hours automatically.

That's all! Your snake .svg image should be properly generated! 🎉
4. Add the .svg images to your README.md
Get the .svg images URL
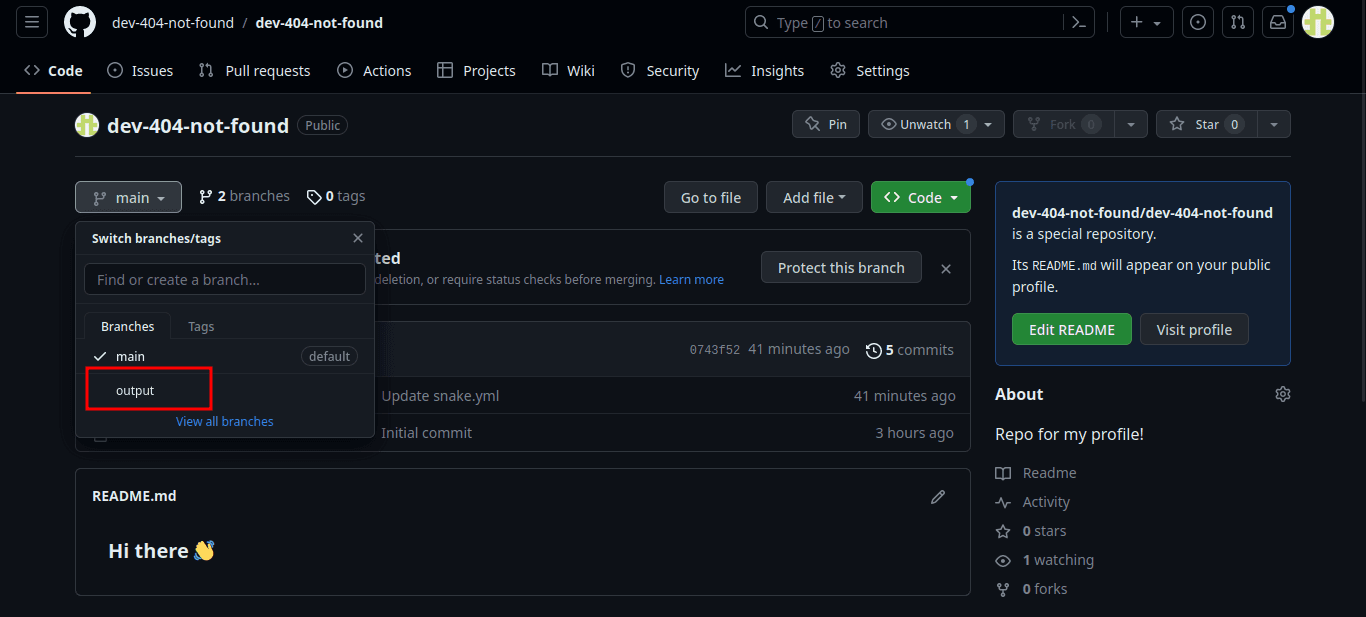
In your repo there should be now 2 branch, the main branch, and the output where the .svg images will be pushed
- Go to your repo -> switch branches -> output
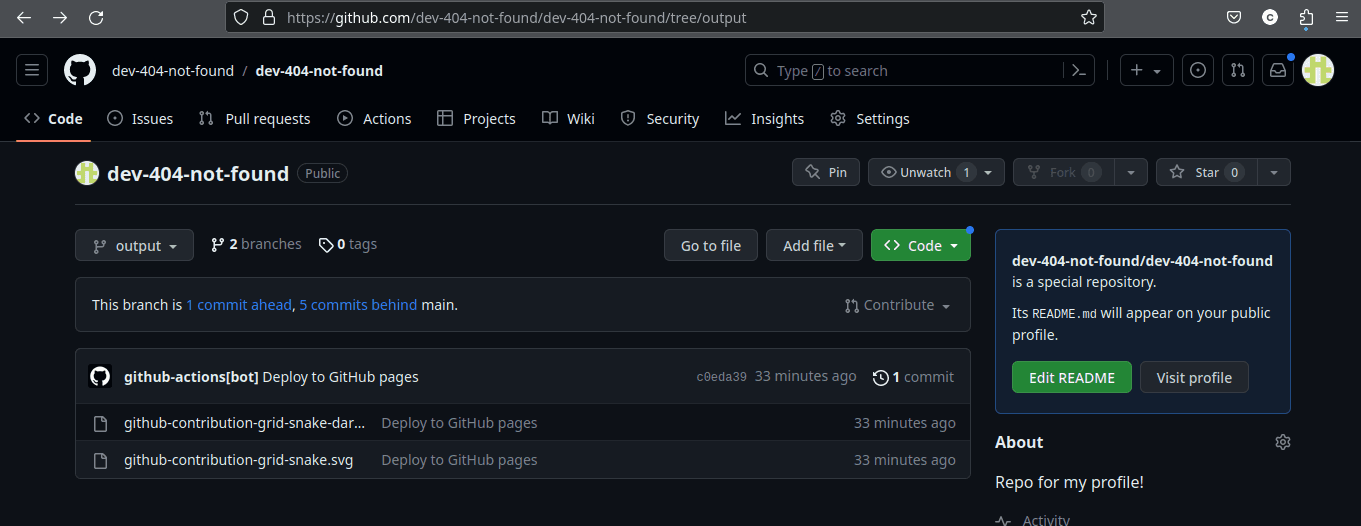
- Click on any of the generated images to obtain the link. The images are:
- github-contribution-grid-snake-dark.svg
- github-contribution-grid-snake.svg
- Click on the Raw button at the top right corner.
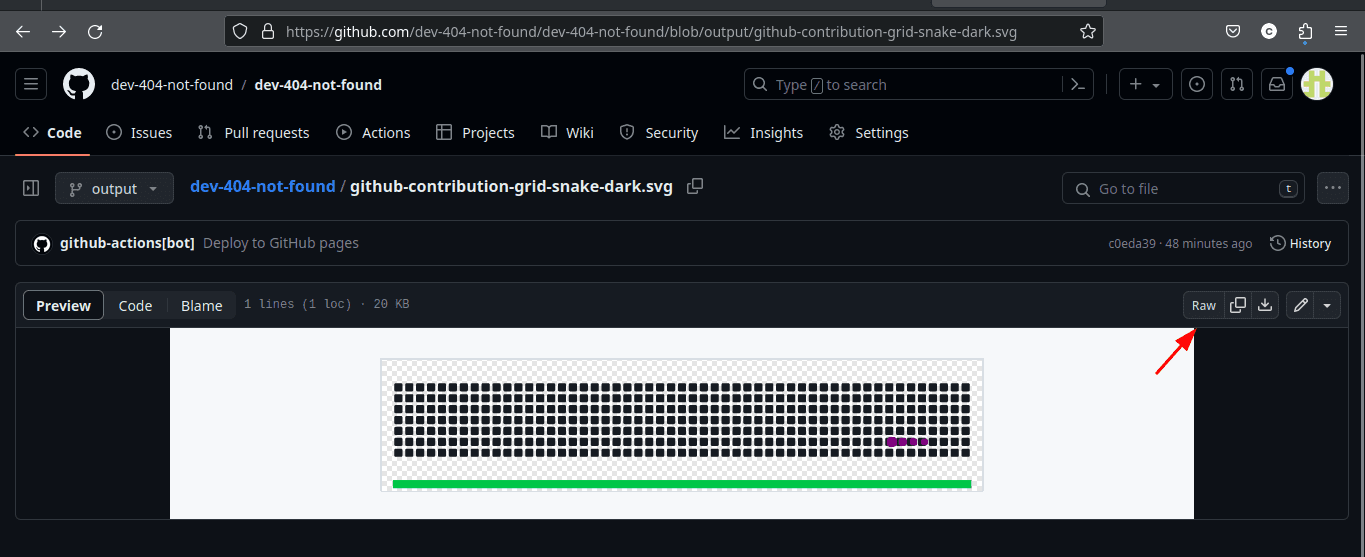
- Copy the URL of any image:

Update your README.md file
- In the main branch of your repo edit the README.md file.
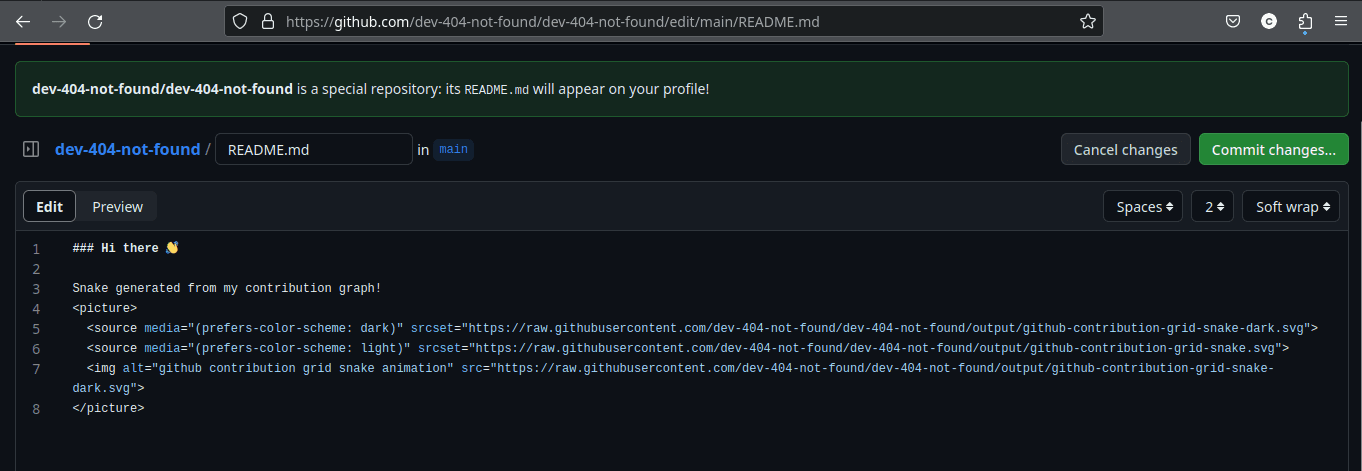
In order to make the image adaptable to normal or dark mode, you can add the images with media queries, as follow (updating the links with your corresponding username):
<picture>
  <source media="(prefers-color-scheme: dark)" srcset="https://raw.githubusercontent.com/dev-404-not-found/dev-404-not-found/output/github-contribution-grid-snake-dark.svg">
  <source media="(prefers-color-scheme: light)" srcset="https://raw.githubusercontent.com/dev-404-not-found/dev-404-not-found/output/github-contribution-grid-snake.svg">
  <img alt="github contribution grid snake animation" src="https://raw.githubusercontent.com/dev-404-not-found/dev-404-not-found/output/github-contribution-grid-snake-dark.svg">
</picture>
- You can preview the changes, to verify that the image is displayed properly.
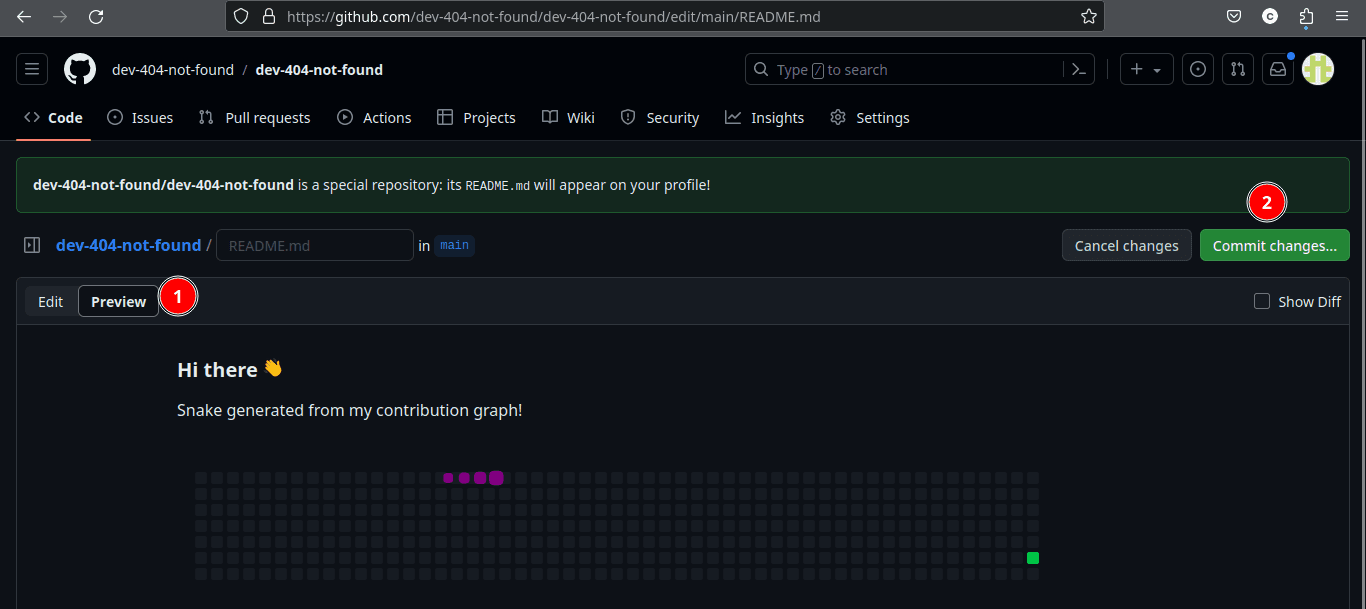
- Commit changes -> Commit directly to the main branch -> Commit changes
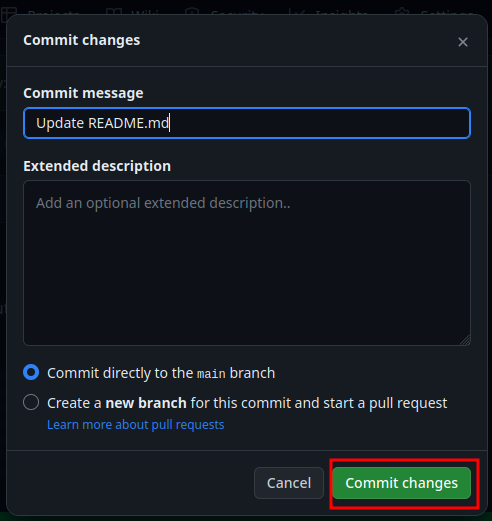
- Done! Enjoy you eating-snake.
Additional information
Special thanks to platane that is the creator of this awesome tool!
The github account used in this tutorial https://github.com/dev-404-not-found is a new github account created to test all the steps given in this tutorial.
My main github account is https://github.com/cristian-encalada. The snake workflow is also configured there if you want to take a look.
Thanks for reading! Any questions or improvements, just leave a comment, I'd be glad to help.